How to Upload Files via Cloud Video Kit API
This guide provides a comprehensive, step-by-step walkthrough for uploading files using the Cloud Video Kit API. All uploads are performed using Amazon S3 Multipart Upload. While multipart uploads can be tricky, this guide aims to clarify the entire process.
Understanding Multipart Upload
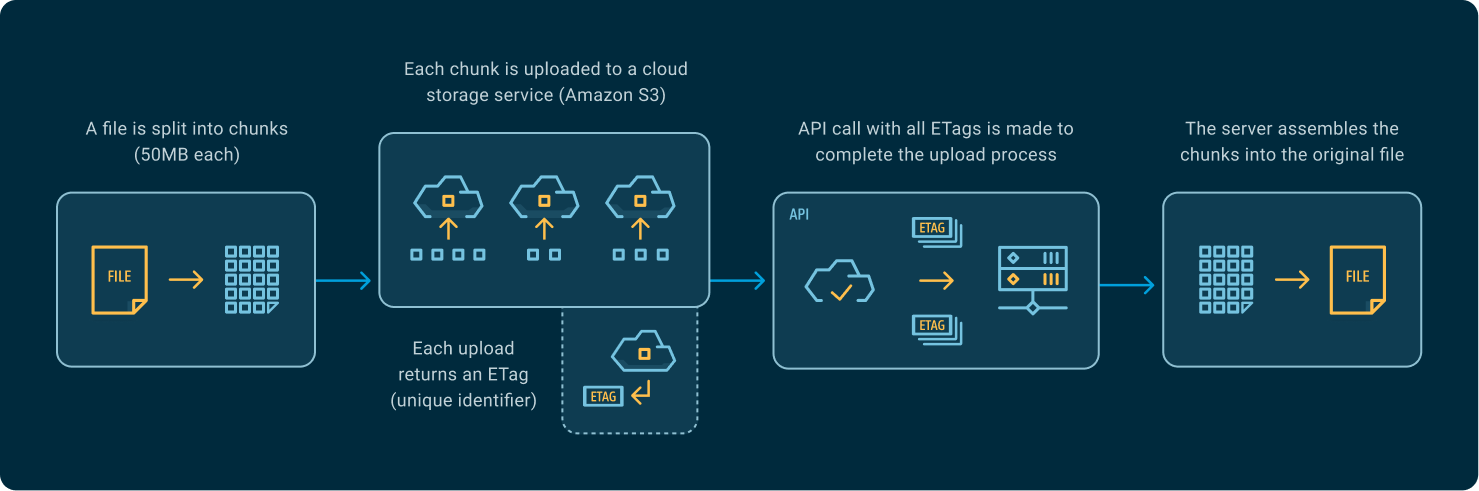
Multipart Upload is a method that enables you to upload a large file by dividing it into smaller, manageable parts (chunks). These parts are then reassembled by the server into a single, complete object. This approach significantly enhances reliability and performance, particularly for large files or when network conditions are unstable.
In the context of this guide, multipart upload facilitates the efficient transfer of video files to the Cloud Video Kit API, with each part being individually uploaded to Amazon S3.
Manual Upload - Postman Example
This section details how to perform a manual multipart upload using Postman. Since multipart uploads require files to be split into smaller chunks, we'll provide simple PowerShell and Bash scripts to assist with this process.
Prerequisites
To successfully upload a file to the Cloud Video Kit API, you will need the following:
- Your file
- Your tenant_name, tenant_id, and API key (for more information, refer to Authorization)
- Postman
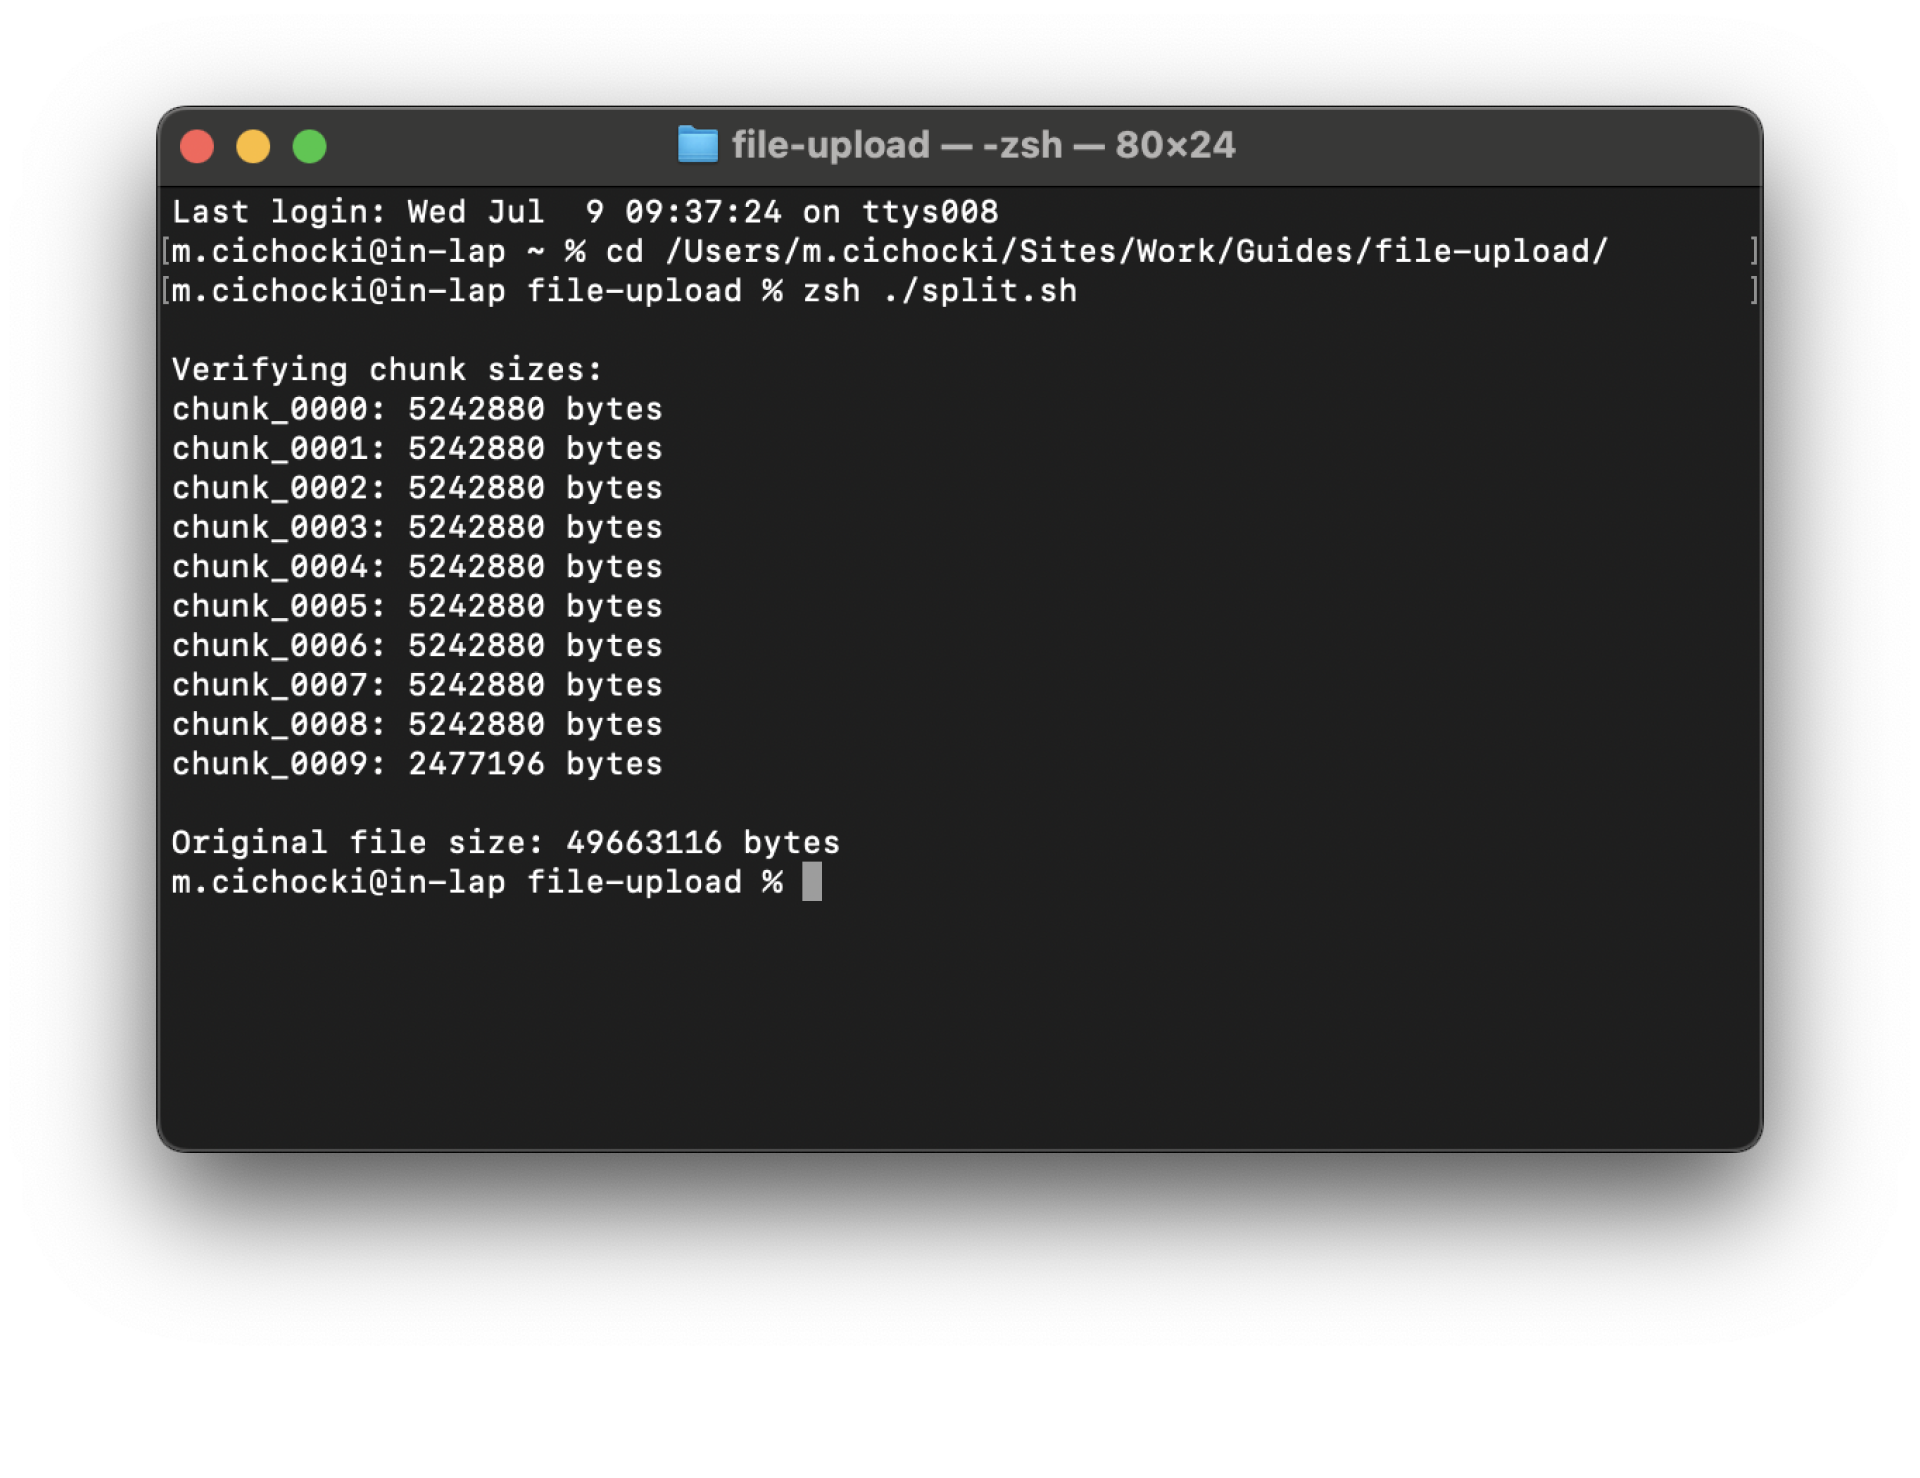
1) Split File into Parts
For a multipart upload, you must divide your file into smaller chunks, with an ideal size of 50MB each. Ensure that the last chunk contains any remaining bytes. Below are example scripts for PowerShell and Bash to help you split your files and determine their exact sizes, which are required for subsequent steps.
- Windows (PowerShell)
- macOS/Linux (Bash)
# Path to the input file
$filePath = "C:\Users\%username%\path\to\file-to-upload.mp4"  # Change this to your actual path
# Output folder for chunks
$outputFolder = "C:\Users\%username%\path\to\chunks"  # Change this to your actual path
# Chunk size in bytes (50MB)
$chunkSize = 50000000

# Create output directory if it doesn't exist
if (!(Test-Path $outputFolder)) {
    New-Item -ItemType Directory -Path $outputFolder | Out-Null
}

# Get file size
$fileSize = (Get-Item $filePath).Length
# Calculate number of chunks
$chunkCount = [Math]::Ceiling($fileSize / $chunkSize)

# Read the file as a byte array
$fileContent = [IO.File]::ReadAllBytes($filePath)

# Split into chunks and save
for ($i = 0; $i -lt $chunkCount; $i++) {
    $start = $i * $chunkSize
    $length = if ($i -lt $chunkCount - 1) { $chunkSize } else { $fileSize - $start }

    $chunk = New-Object byte[] $length
    [Array]::Copy($fileContent, $start, $chunk, 0, $length)

    $outputPath = Join-Path $outputFolder ("chunk_{0:D4}.bin" -f $i)
    [IO.File]::WriteAllBytes($outputPath, $chunk)

    Write-Host "Created chunk $($i + 1) of ${chunkCount}: $outputPath ($length bytes)"
}

# Verify chunk sizes
Write-Host "`nVerifying chunk sizes:"
Get-ChildItem -Path $outputFolder -Filter "chunk_*.bin" |
    Sort-Object Name |
    ForEach-Object {
        Write-Host "$($_.Name): $($_.Length) bytes"
    }

# Show original file size
Write-Host "`nOriginal file size: $fileSize bytes"
#!/bin/bash

# Path to the input file
filePath="~/path/to/file-to-upload.mp4"  # Change this to your actual path
# Output folder
outputFolder="~/path/to/chunks"  # Change this to your actual path
# Chunk size in bytes (50MB)
chunkSize=50000000

# Create output directory if it doesn't exist
mkdir -p "$outputFolder"

# Change to output directory
cd "$outputFolder" || exit

# Split file into chunks
    split -b ${chunkSize} -a 4 -d "$filePath" "chunk_"

# Verify chunk sizes
echo -e "\nVerifying chunk sizes:"
for file in chunk_*; do
    if [[ -f "$file" ]]; then
        size=$(stat -c%s "$file" 2>/dev/null || stat -f%z "$file")
        echo "$file: $size bytes"
    fi
done

# Show original file size
originalSize=$(stat -c%s "$filePath" 2>/dev/null || stat -f%z "$filePath")
echo -e "\nOriginal file size: $originalSize bytes"
2) Initiate File Upload
Execute the Start file upload API call. For detailed documentation, refer to Start file upload.
Start File Upload
Specifics
| Method URL | https://{tenant_name}.api.videokit.cloud/vod/v1/files/start |
| HTTP method | POST |
Request Parameters
| Parameter | Required | Type | Notes |
|---|---|---|---|
name | Yes | string | Name of the file (max 1024 characters) |
friendlyName | Yes | string | Friendly name of the file (max 1024 characters) |
metadata | No | object | Additional metadata for the file |
fileSize | Yes | int64 | Size of the file in bytes, acquired in previous step |
Response Fields
| Field | Type | Notes |
|---|---|---|
fileId | string | ID of the file |
multipartUrls | Array of strings | URLs for multipart upload |
fileKey | string | Key of the file |
partSize | int64 | Size of each part for multipart upload |
lastPartSize | int64 | Size of the last part |
partsCount | int64 | Total number of parts |
curl -X POST \
  https://{tenant_name}.api.videokit.cloud/vod/v1/files/start \
  -H 'Content-Type: application/json' \
  -H 'X-Api-Key: {your_api_key}' \
  -H 'X-Tenant-Id: {tenant_id}' \
  -d '{
    "name": "file-to-upload.mp4",
    "friendlyName": "My New Awesome Video",
    "metadata": {
      "category": "entertainment"
    },
    "fileSize": 76251798
  }'
{
  "fileId": "file_12345",
  "multipartUrls": [
    "https://upload.example.com/part1?token=abc123",
    "https://upload.example.com/part2?token=def456"
  ],
  "fileKey": "path/to/my_video.mp4",
  "partSize": 50000000,
  "lastPartSize": 26251798,
  "partsCount": 2
}
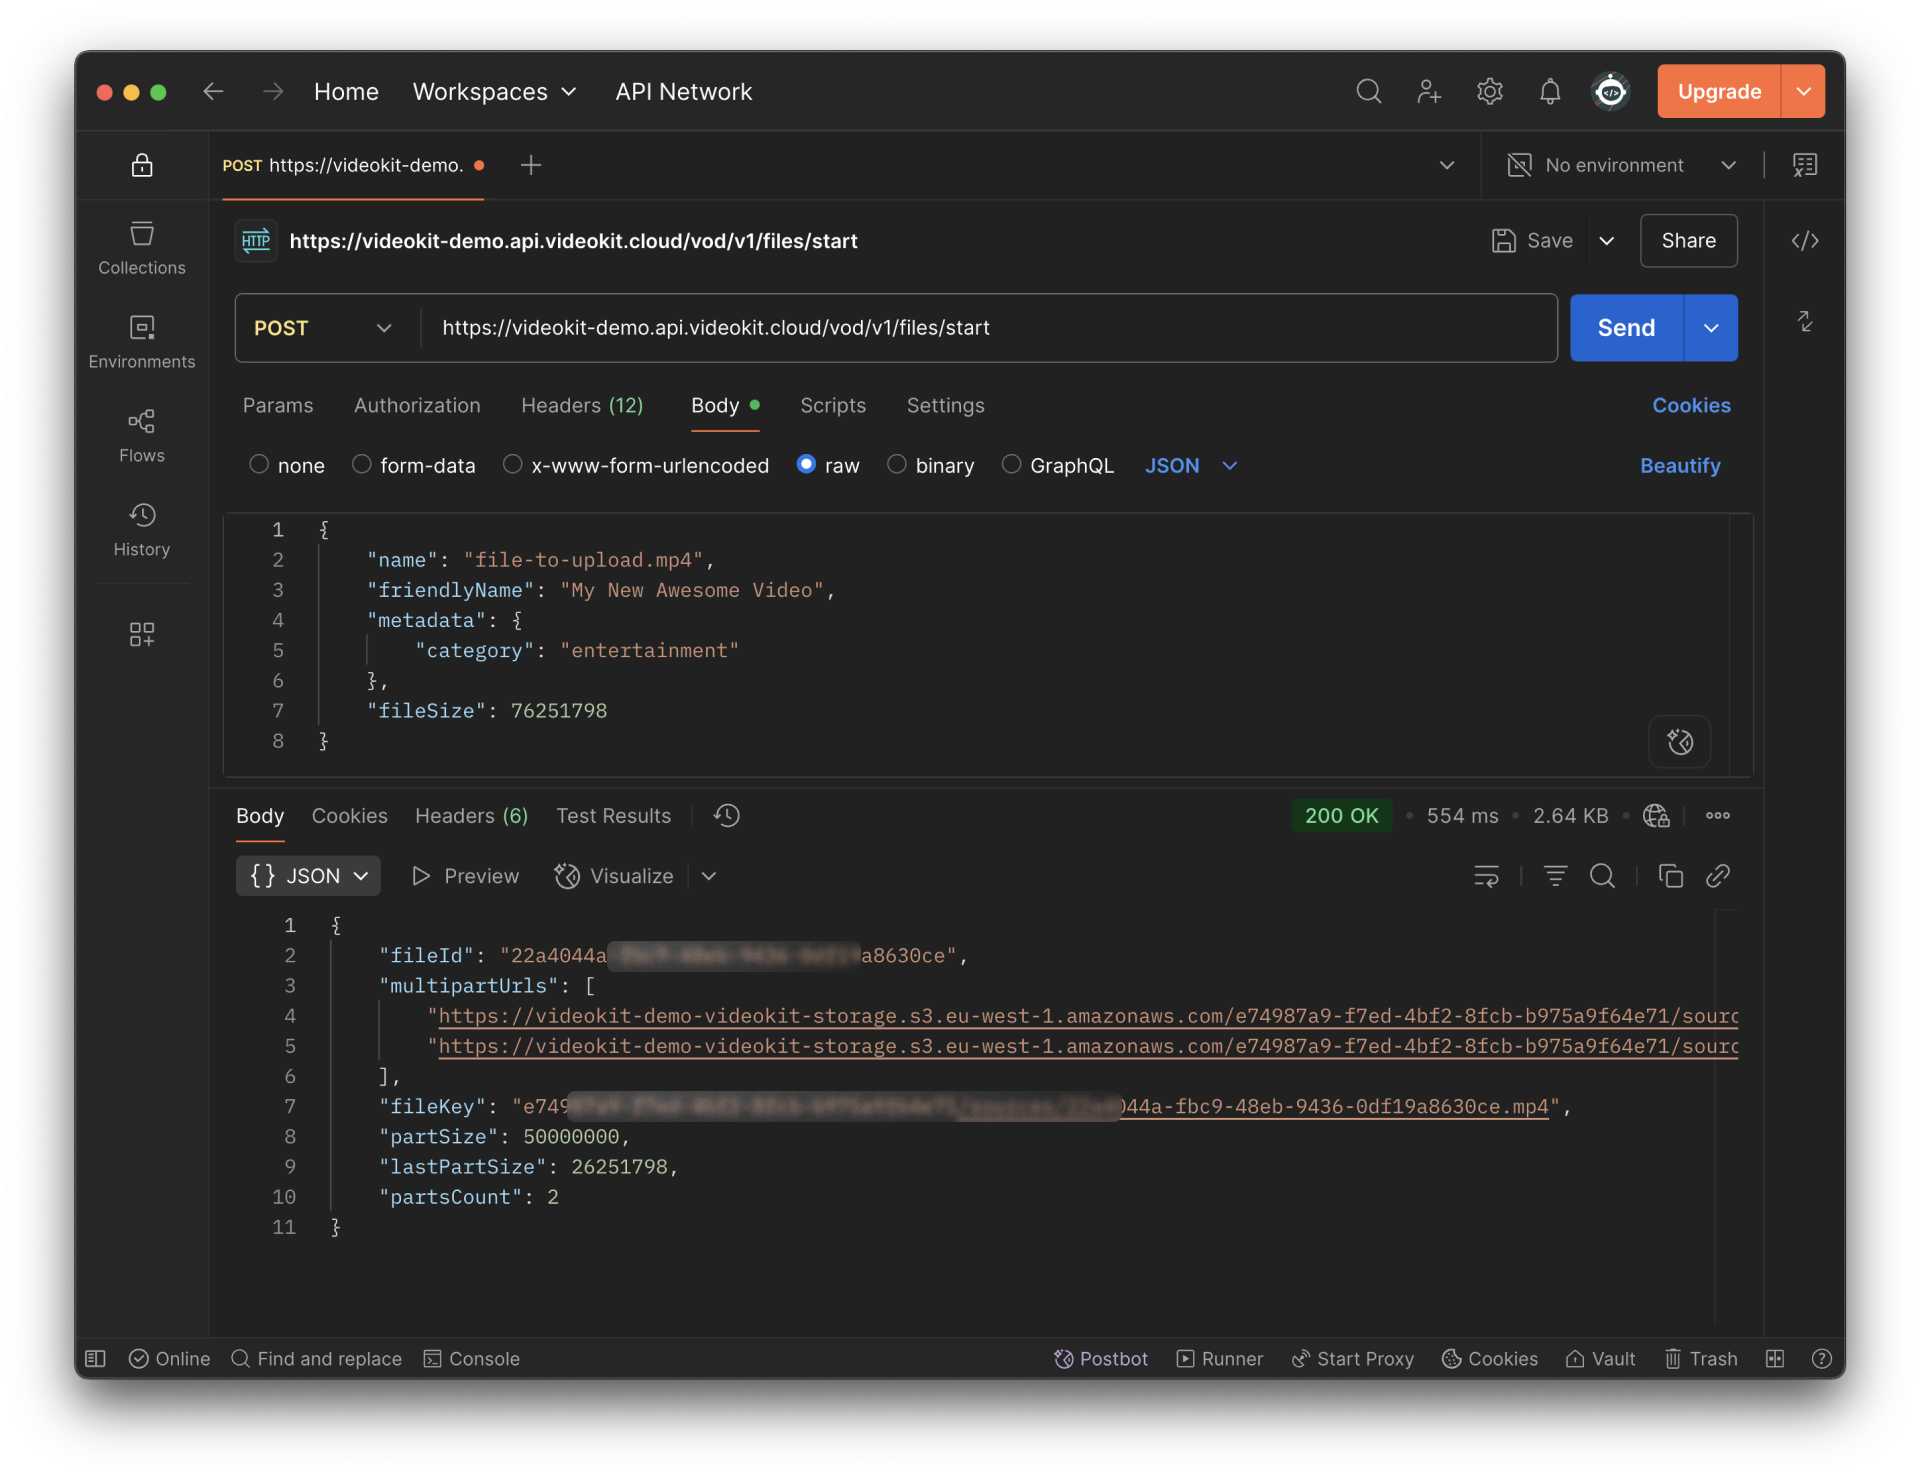
The response will provide URLs for a maximum of three file parts. For subsequent parts, use the Get next part upload URL endpoint.
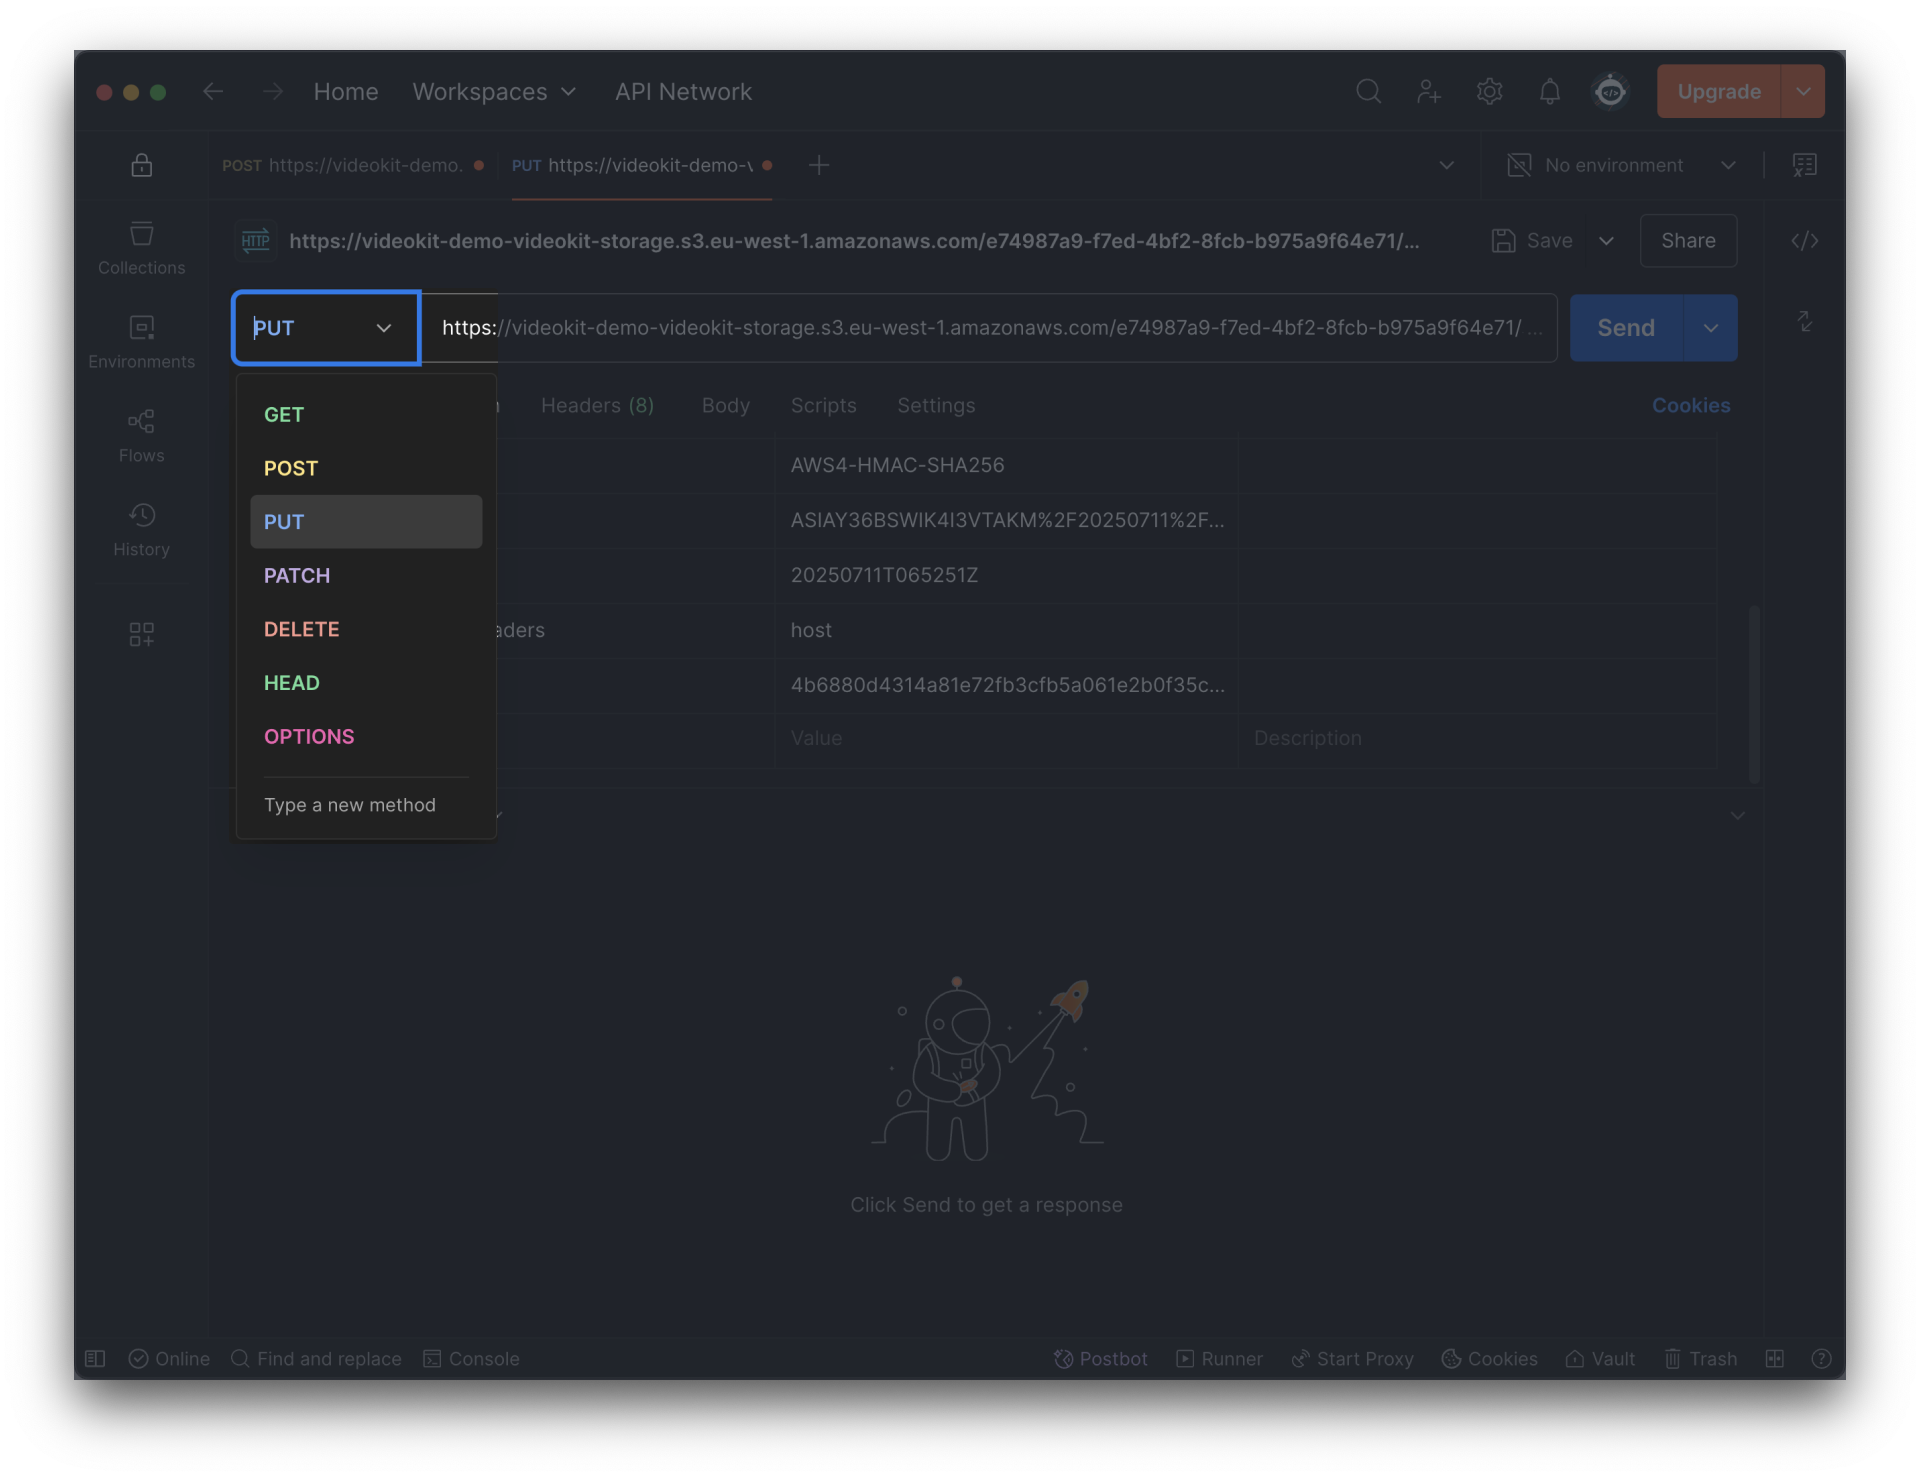
3) Upload Files to Amazon S3
- Utilize the URLs obtained from the previous step to upload file parts to the designated S3 locations.
- Navigate to the Body tab, change the type to "binary", and select the file from your device.
- Send the request.
- After the request is sent, copy the ETag from the response headers, as it will be required in the subsequent steps.
Ensure you use the PUT HTTP method.
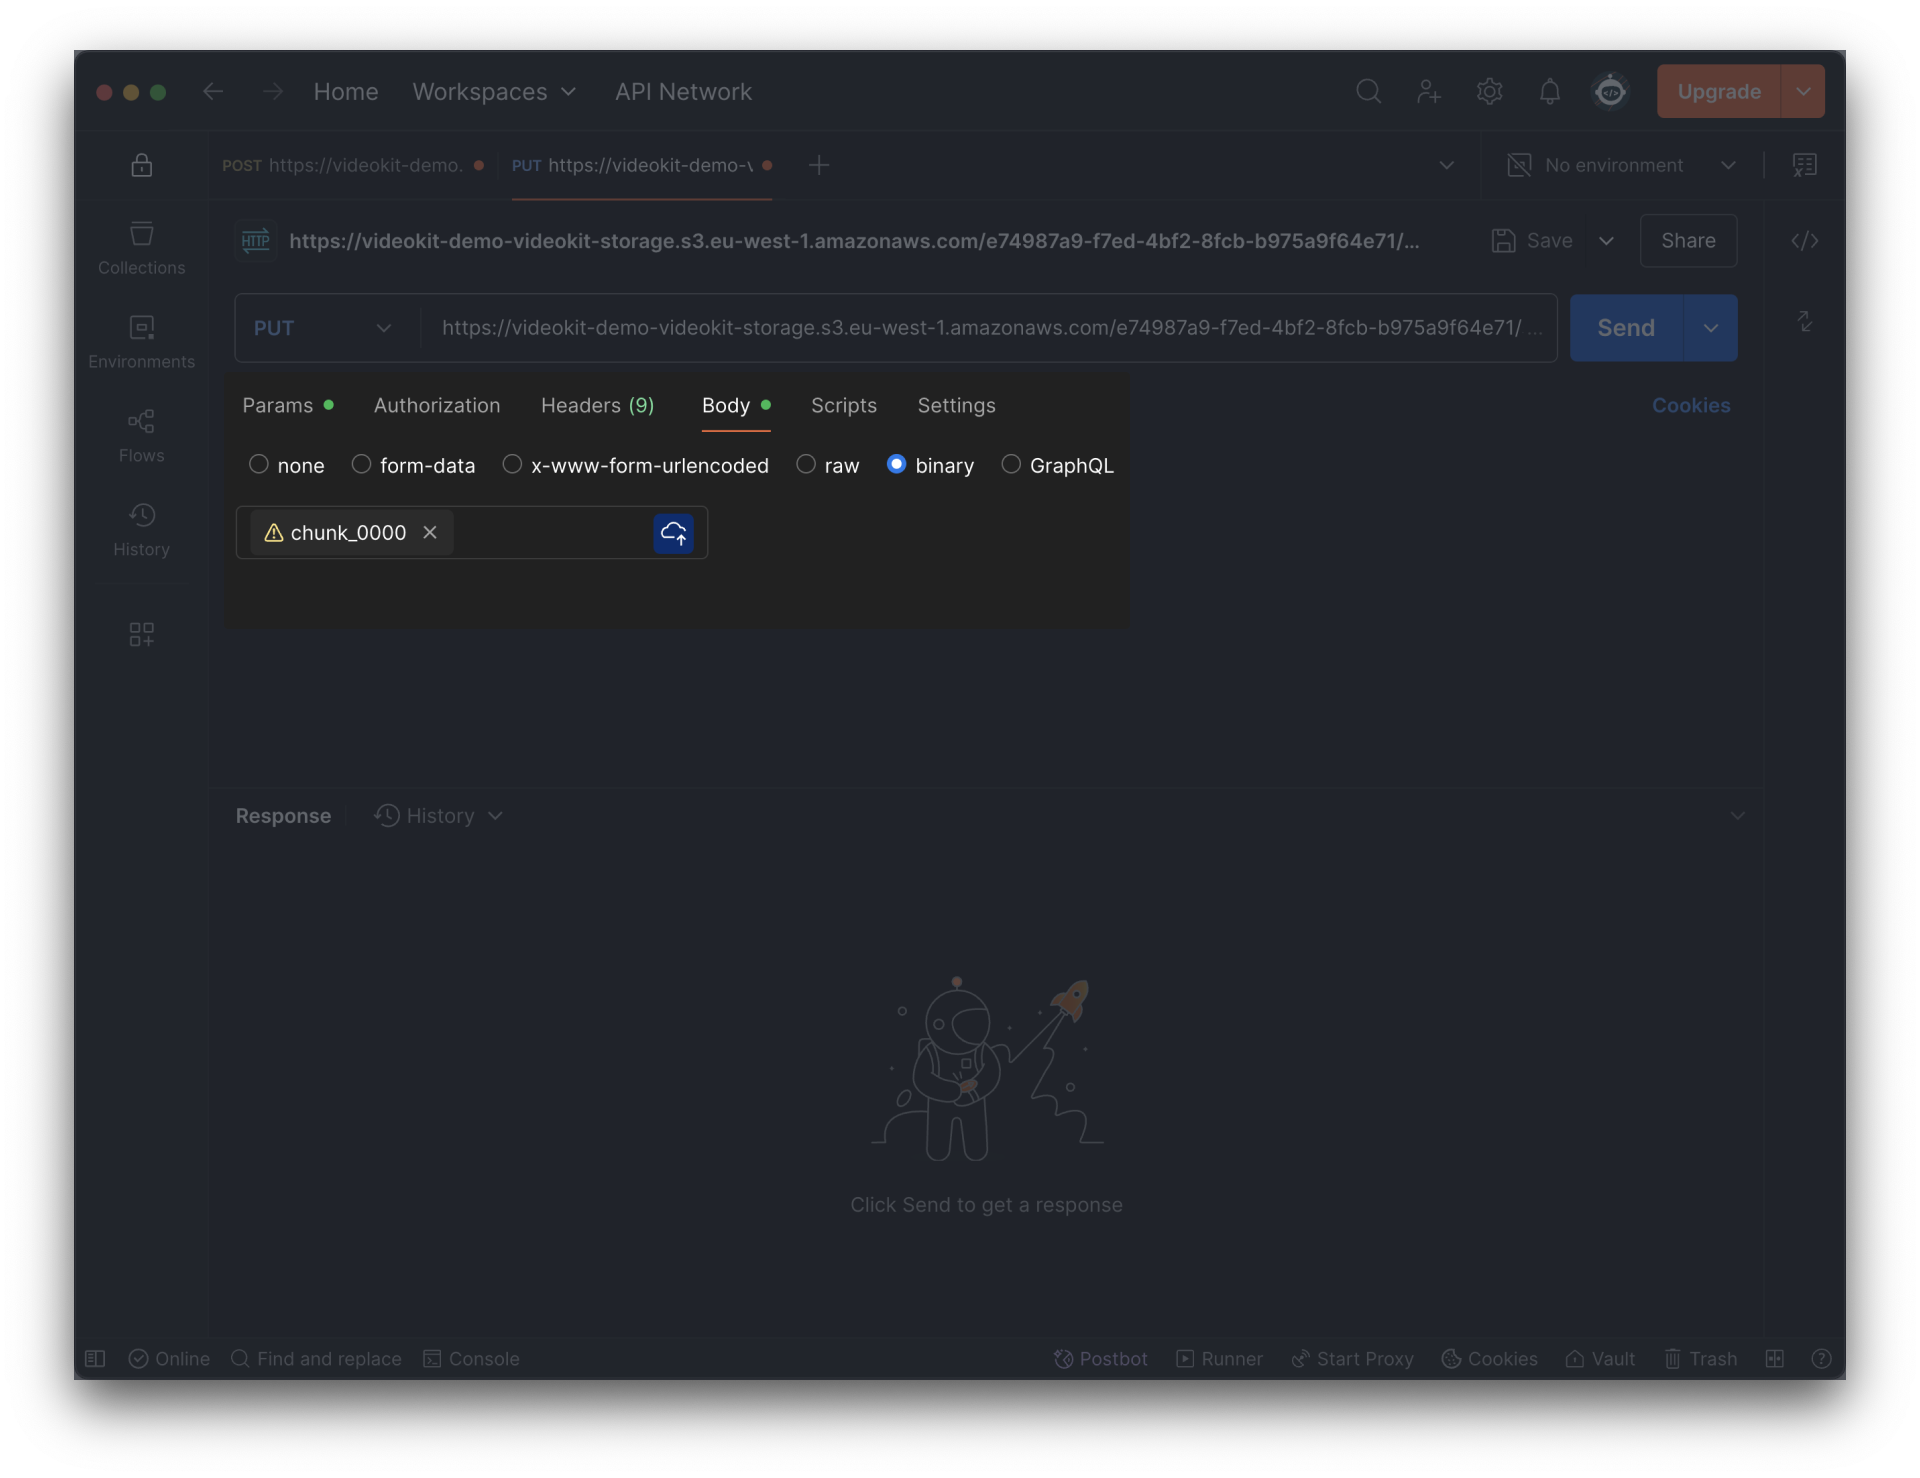
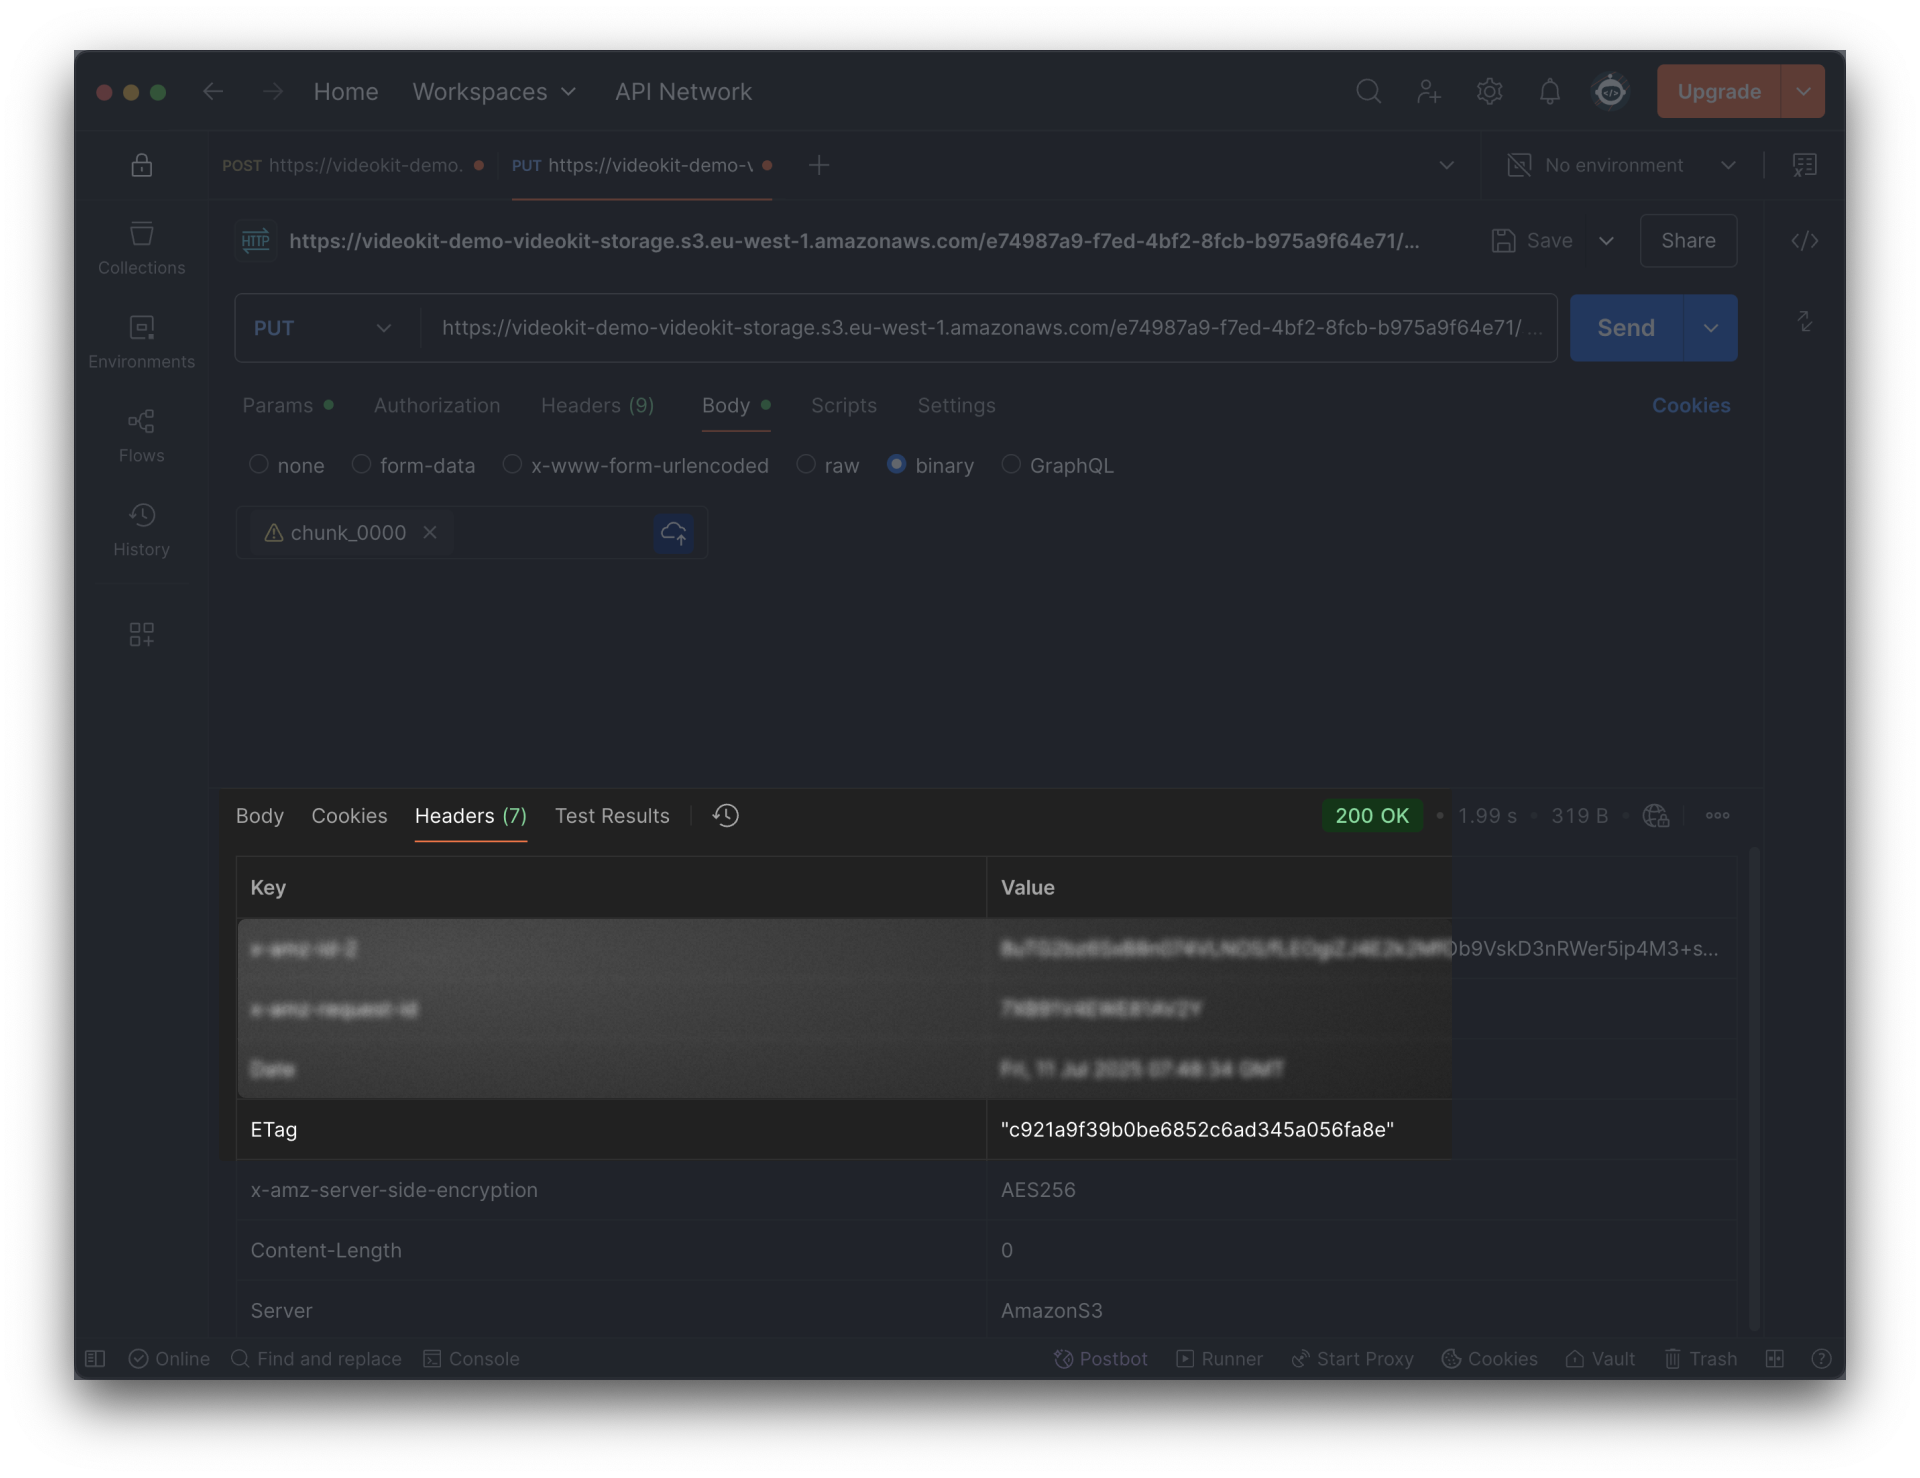
An ETag (Entity Tag) is a unique identifier for a specific version of a resource. In multipart uploads, each successfully uploaded part receives its own ETag. You must collect these individual ETags and include them in your final "complete" request. This tells the server how to precisely reassemble all the parts into your full file.
4) Complete File Upload
Finalize the file upload process by calling the Finish file upload method. This must be invoked after all parts have been successfully uploaded. For further details, see Finish file upload.
Finish File Upload
Specifics
| Method URL | https://{tenant_name}.api.videokit.cloud/vod/v1/files/complete |
| HTTP method | POST |
Request Parameters
| Parameter | Required | Type | Notes |
|---|---|---|---|
fileId | Yes | string | File ID from the start upload process |
parts | Yes | Array of PartETag | Array of part numbers and their ETags |
parts.partNumber | Yes | integer | |
parts.eTag | Yes | string | eTag from header response, acquired in previous steps |
Response Fields
| Field | Type | Notes |
|---|---|---|
fileId | string | ID of the uploaded file |
fileKey | string | Key of the uploaded file |
curl -X POST \
  https://{tenant_name}.api.videokit.cloud/vod/v1/files/complete \
  -H 'Content-Type: application/json' \
  -H 'X-Api-Key: {your_api_key}' \
  -H 'X-Tenant-Id: {tenant_id}' \
  -d '{
    "fileId": "file_12345",
    "parts": [
      {
        "partNumber": 1,
        "eTag": "abc123"
      },
      {
        "partNumber": 2,
        "eTag": "def456"
      }
    ]
  }'
{
  "fileId": "file_12345",
  "fileKey": "path/to/my_video.mp4"
}
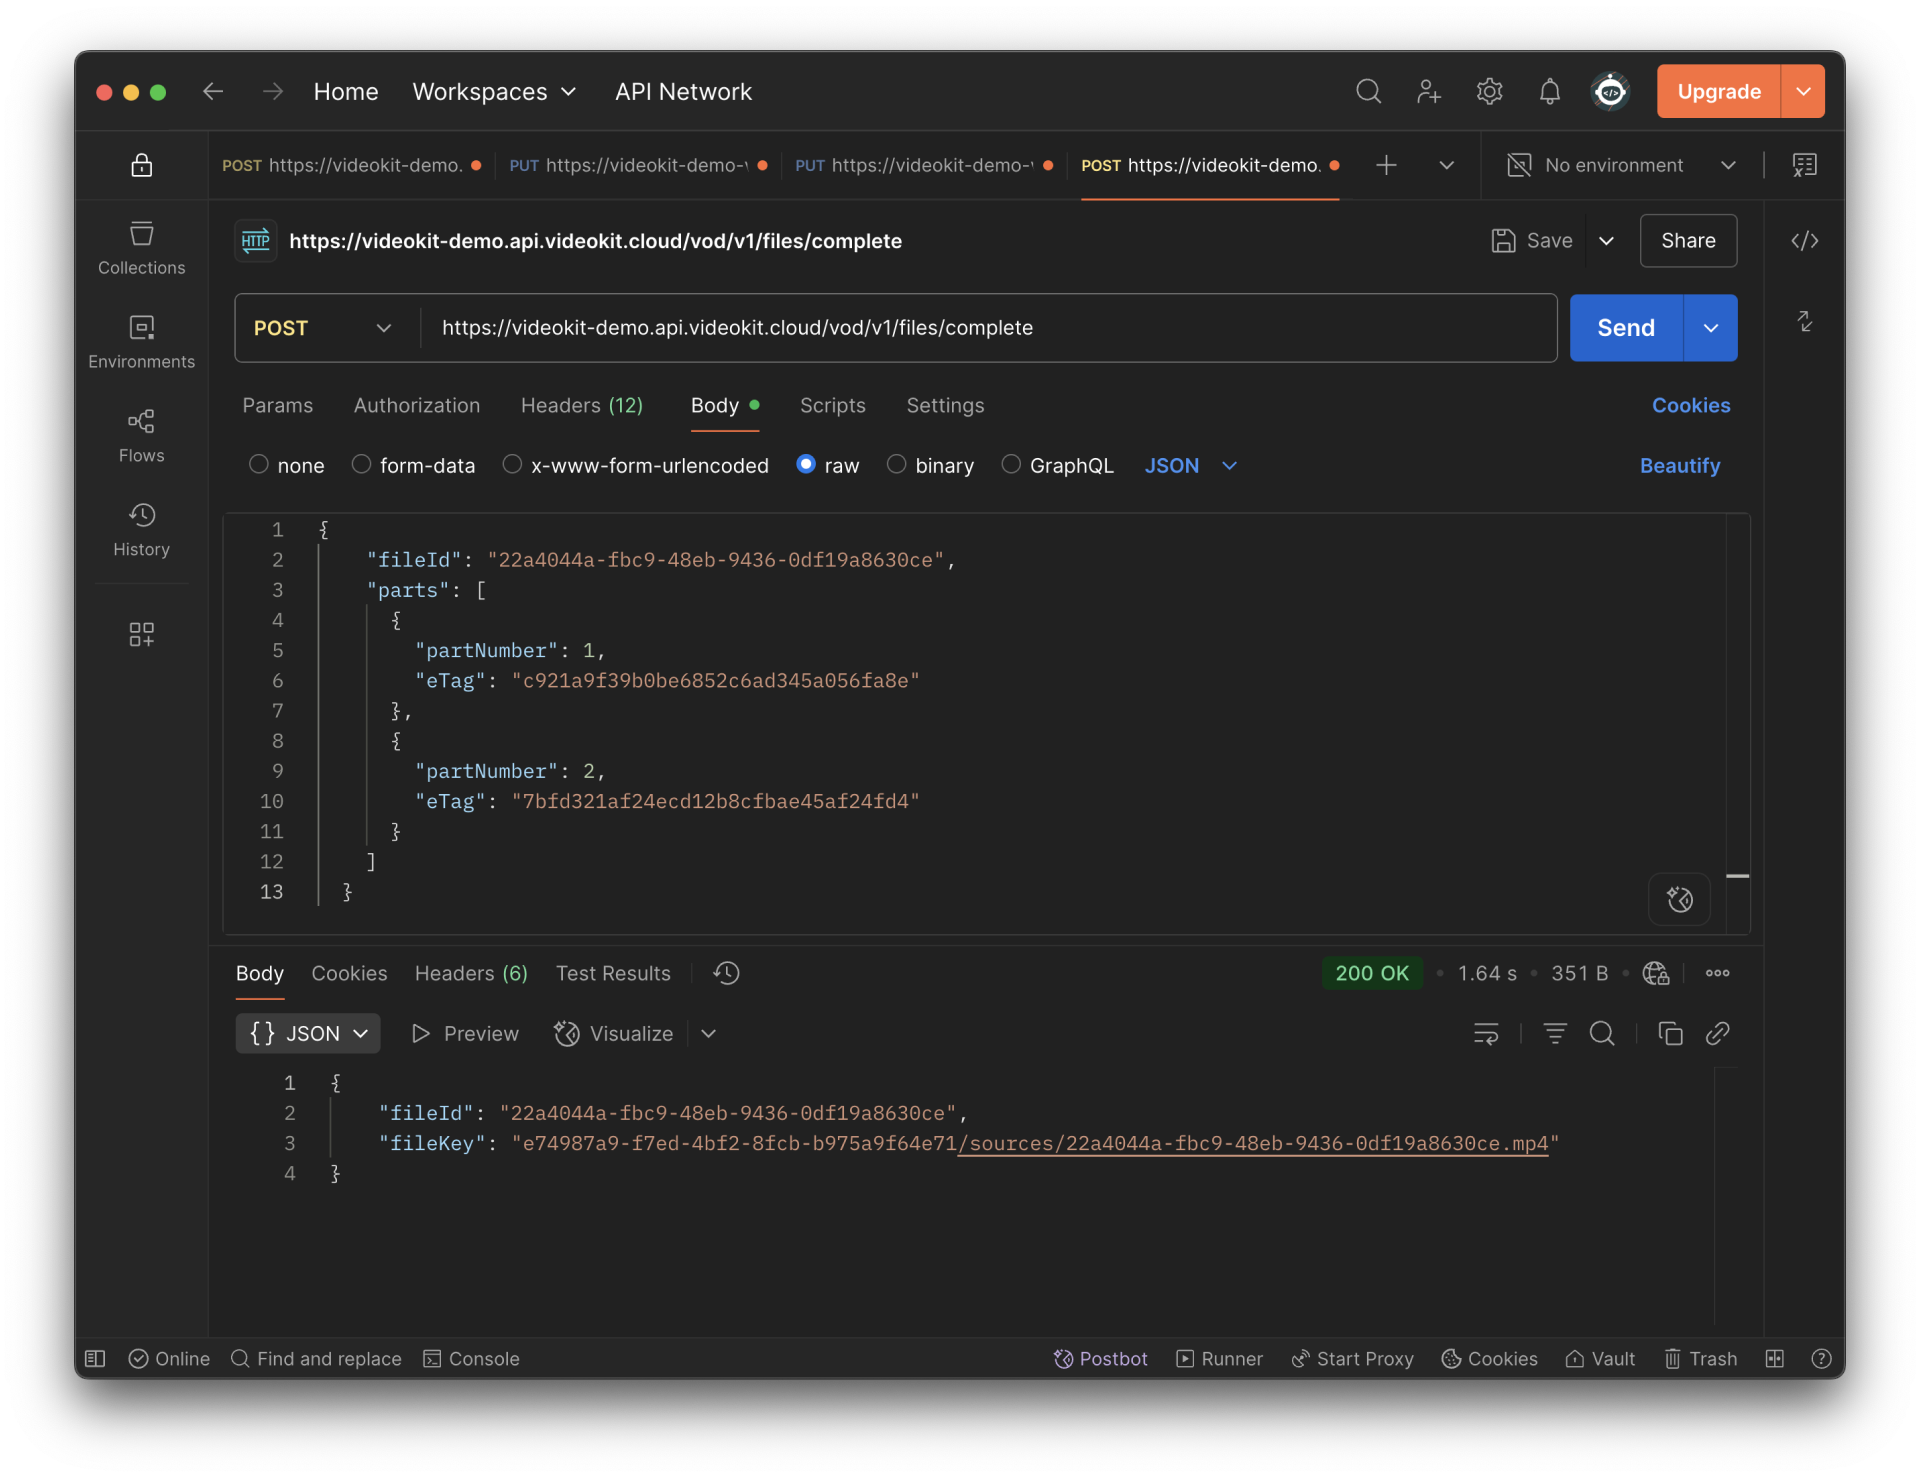
Ensure all part numbers and their corresponding ETags are included in the request to successfully complete the file upload.
Your file has now been successfully uploaded!
Manual Upload - Optional steps
Preview Uploaded Files
After uploading your file, you can retrieve a preview URL using the Get file preview URL endpoint.
Get File Preview URL
Specifics
| Method URL | https://{tenant_name}.api.videokit.cloud/vod/v1/files/{id}/preview |
| HTTP method | GET |
Request Parameters
| Parameter | Required | Type | Notes |
|---|---|---|---|
id | Yes | string | File ID |
Response Fields
| Field | Type | Notes |
|---|---|---|
link | string | Preview URL for the file |
expirationDate | string <date-time> | Expiration date of the preview URL |
curl -X GET \
  https://{tenant_name}.api.videokit.cloud/vod/v1/files/file_12345/preview \
  -H 'X-Api-Key: {your_api_key}' \
  -H 'X-Tenant-Id: {tenant_id}'
{
  "link": "[https://preview.example.com/file_12345?token=abc123](https://preview.example.com/file_12345?token=abc123)",
  "expirationDate": "2023-07-02T12:00:00Z"
}
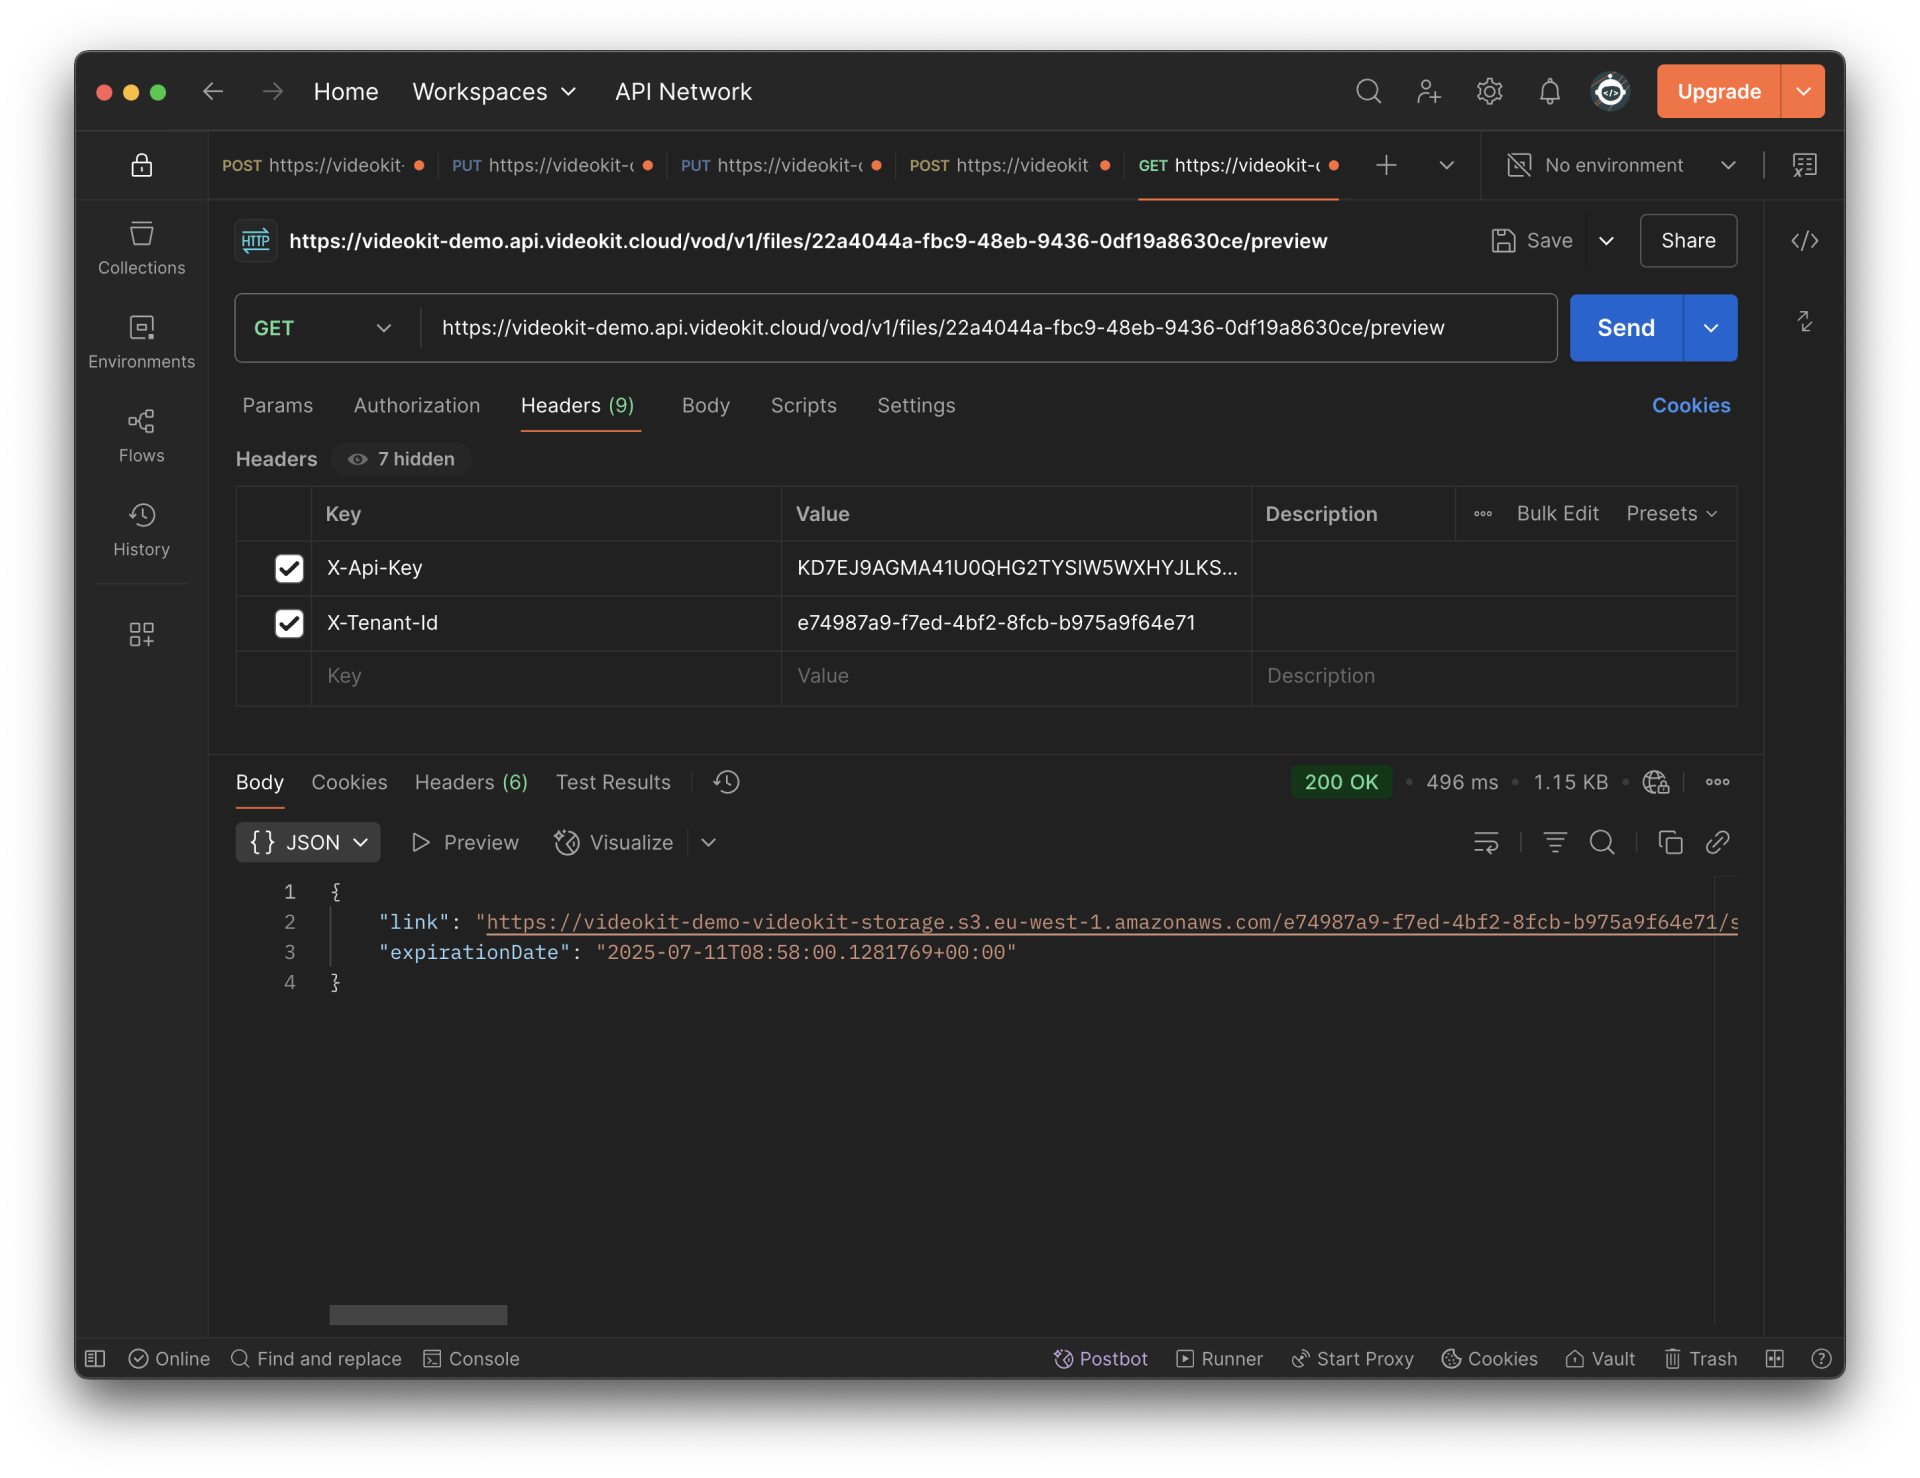
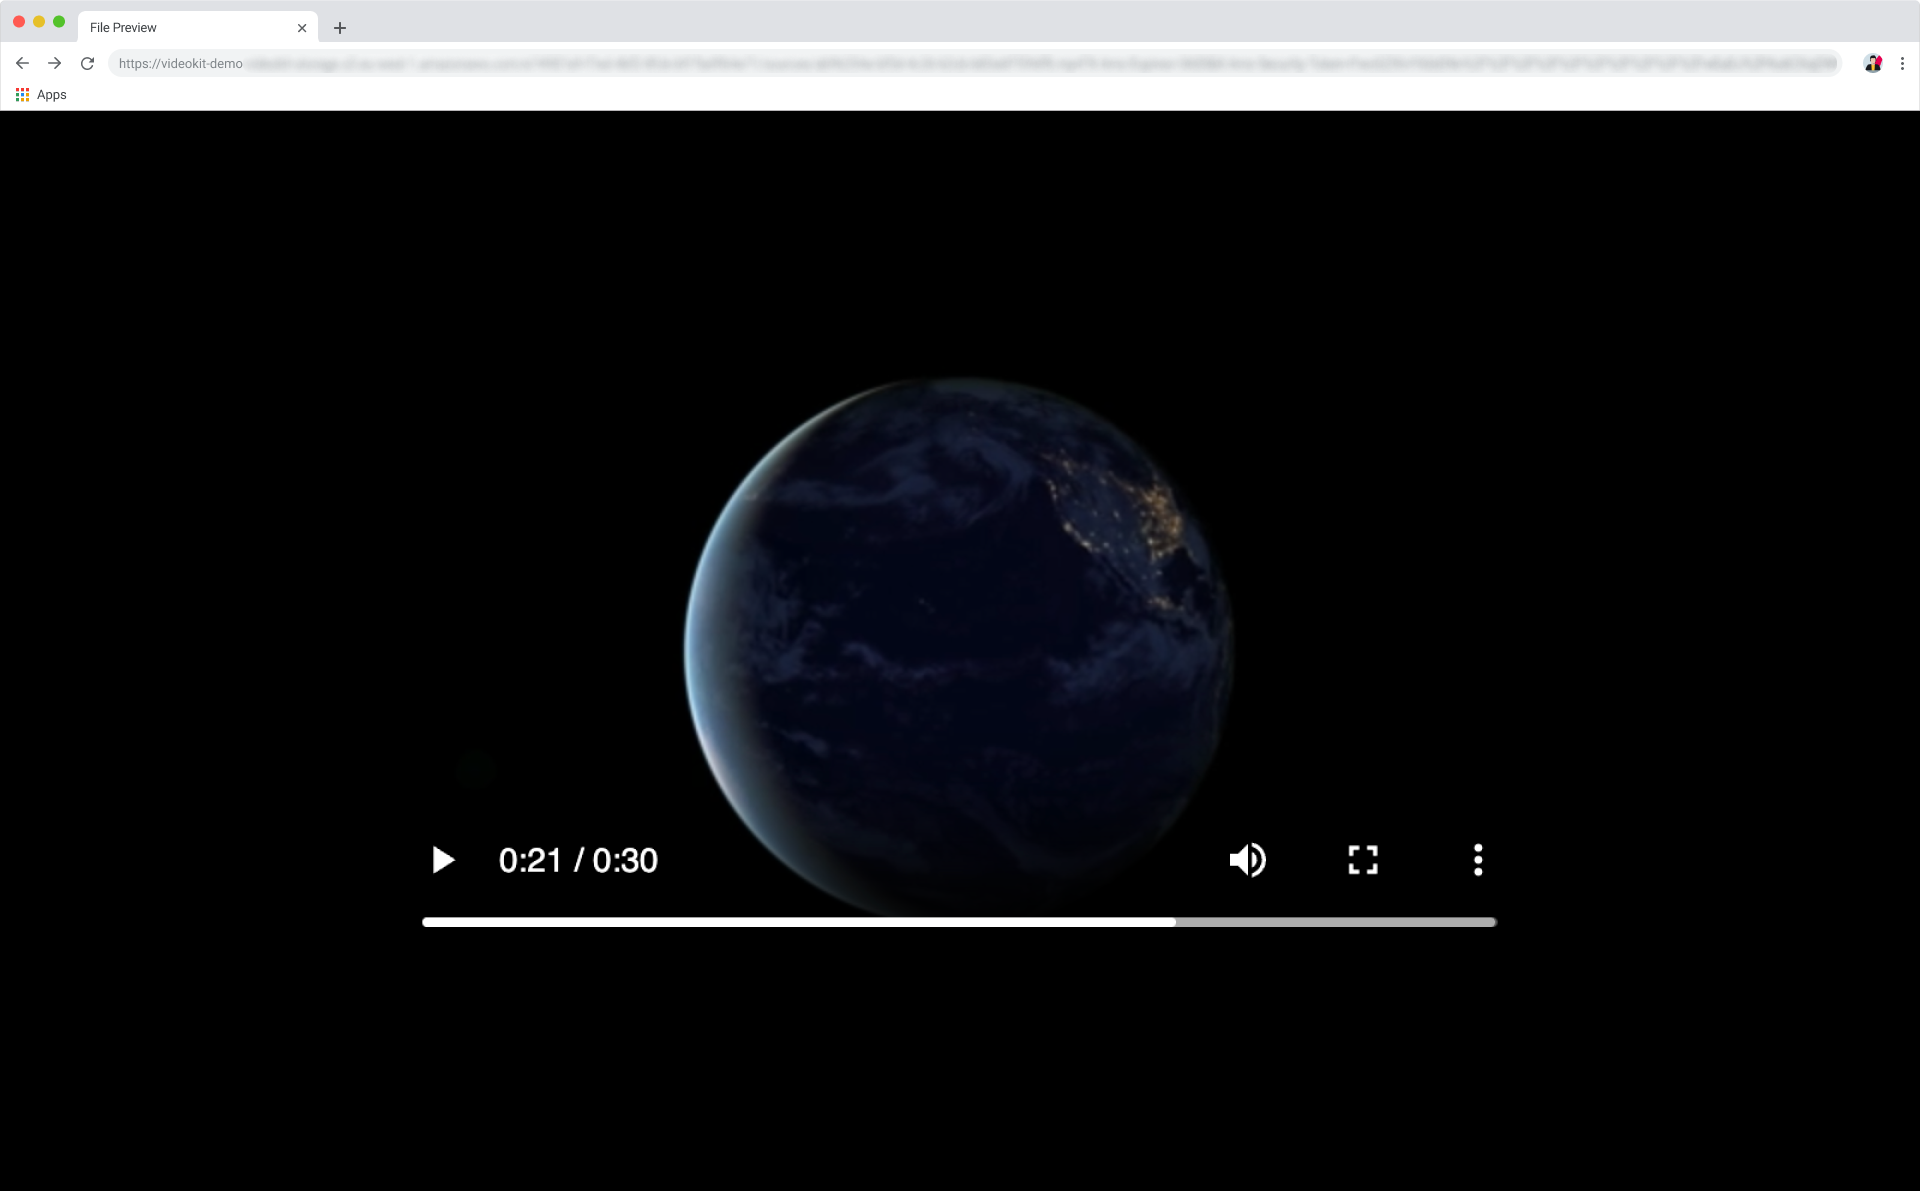
You can directly access the returned link in your web browser.
HTML + JS - Cloud Video Kit SDK Example
GitHub Repository
Access our example on GitHub: https://github.com/cloud-video-kit/sample-cvk-api
Installation
The sample application requires Node.js version 18 or higher.
To install and run:
npm install
npm run start
Sample Application Overview
The provided sample application illustrates how to interact with the Cloud Video Kit REST API. It features an Express.js web server that acts as a proxy, forwarding requests to the Cloud Video Kit API. The frontend is a straightforward HTML page with JavaScript code that communicates with the server-side API.
To utilize the service API, you will need the following credentials:
- API key: Available on the API Cheatsheet page
- Tenant name
Before initiating the application, confirm that your .env file is properly configured with your credentials.
Operational Flow
- Initial Setup: The server-side component of the application functions as a proxy, relaying requests to the Cloud Video Kit API using the provided API key.
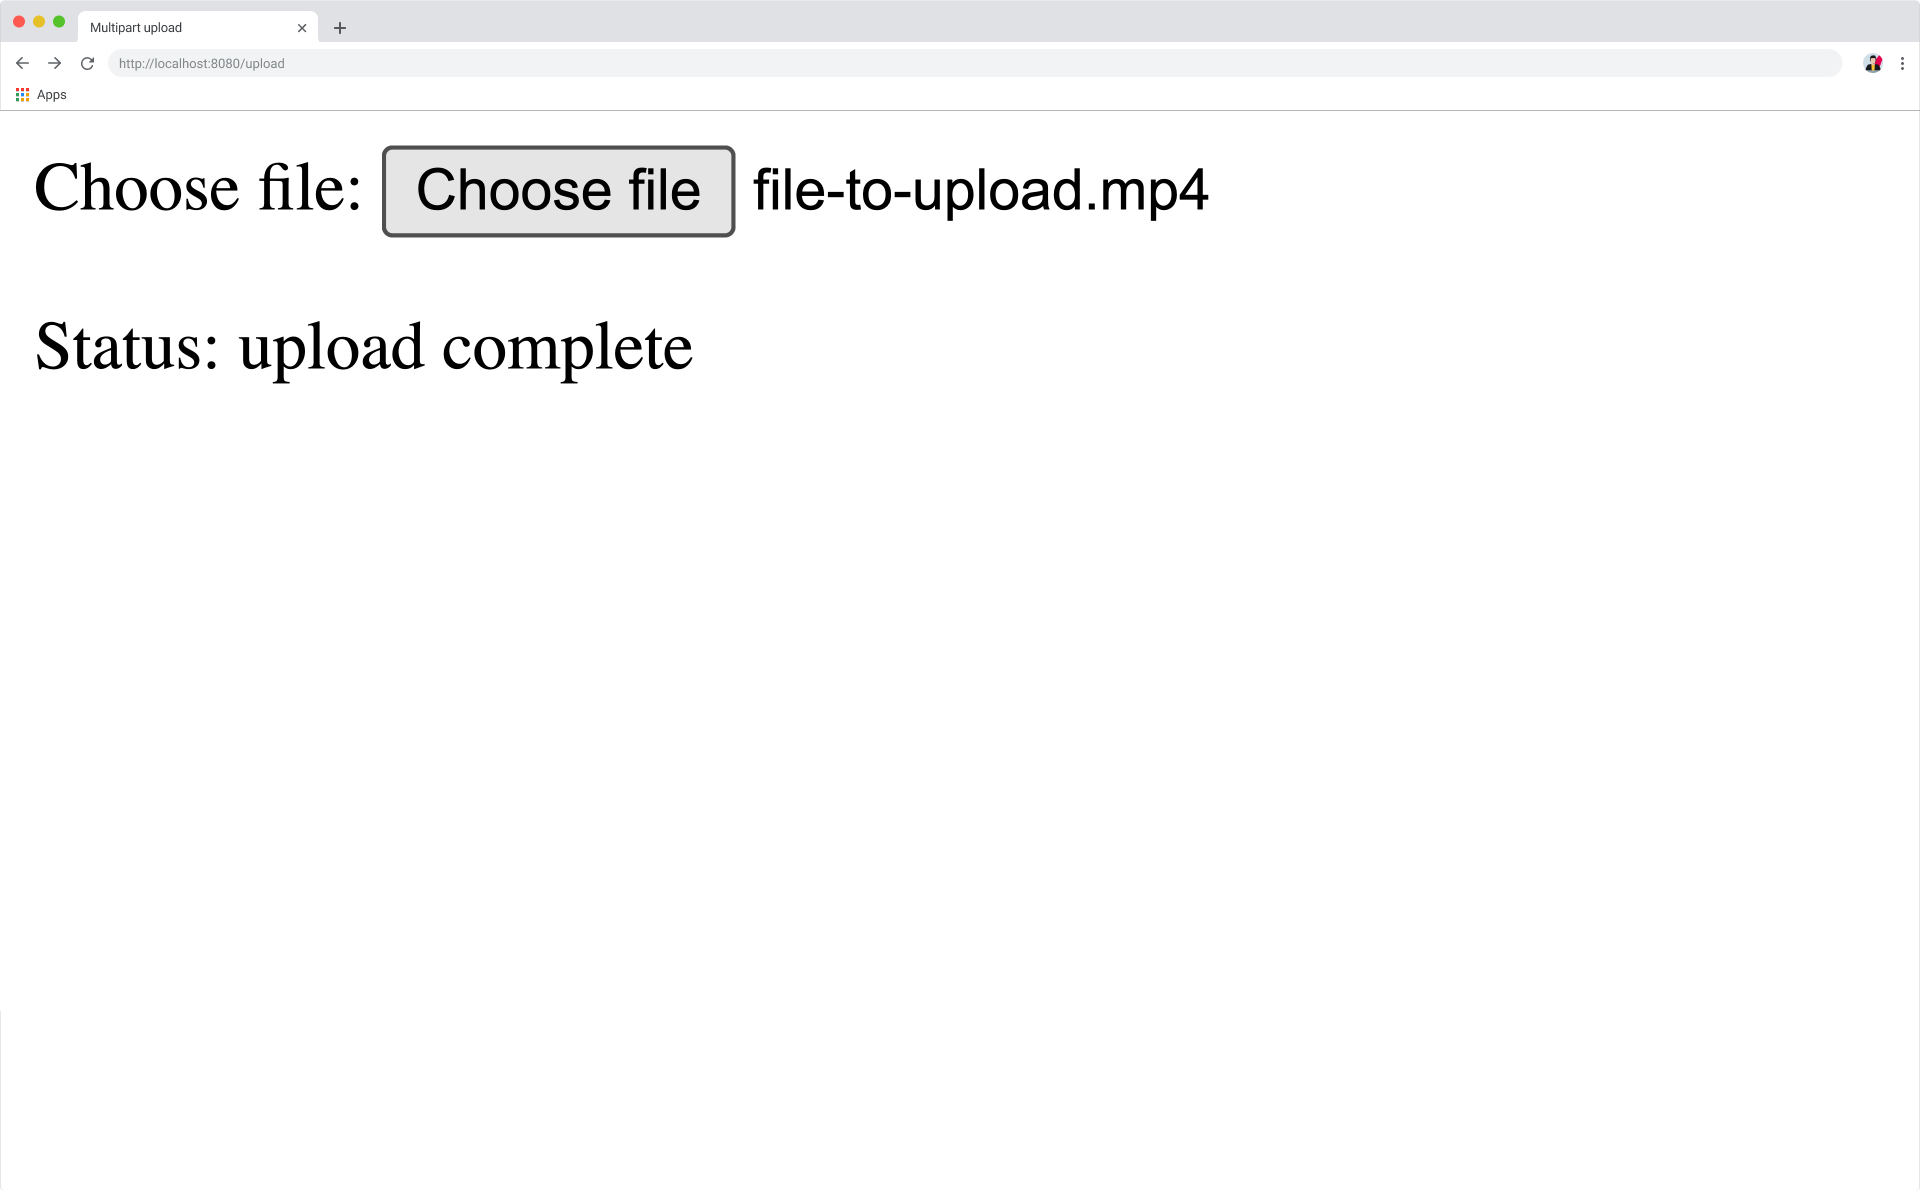
Upload File Example (/upload)
- The application first retrieves a list of acceptable file extensions from Cloud Video Kit via the
/vod/filetypesendpoint. - The upload process begins on the frontend by sending a
/vod/startrequest, including the file size, file name, and friendly name. The frontend then receives the following in response:fileId: A unique identifier for the file.partsCount: The total number of parts the file needs to be uploaded in.multipartUrls: A list of URLs designated for uploading file parts. If this list is shorter than thepartsCount, additional URLs must be fetched from another endpoint.uploadId: A unique identifier for the upload operation.partSize: The specified size for each file chunk to be uploaded.
- File parts are uploaded using the initial
multipartUrlsprovided in the/vod/startresponse. - If
partsCountexceeds the number of URLs provided in the initialmultipartUrlsfield, the remaining URLs must be fetched from the/files/FILE_ID/part/PART_NUMBERendpoint. - After all file parts have been uploaded, the process is completed by sending a POST request to
/vod/files/complete/, containing:fileId: The unique file ID.parts: An array of objects, each withpartNumberandeTagproperties obtained from the response of each uploaded part.
In this example, multiple file parts are uploaded concurrently to optimize the upload speed.
Handling issues
This section addresses common issues, mistakes, and errors, along with their solutions.
- ETags: Verify that you have collected the ETag from every part of the file after its upload.
- Part File Size: Confirm that all parts, with the exception of the very last one, have been split into 50 MB chunks.
- HTTP Method: Ensure the correct HTTP method is selected for each API request. Use PUT HTTP method for uploading chunks of your file.
- Expired Token Error: The token for uploading your file chunk has expired. Use the Get next part upload URL endpoint to try retrieve new URL.
For improved efficiency, consider uploading multiple file parts simultaneously to expedite the overall process.